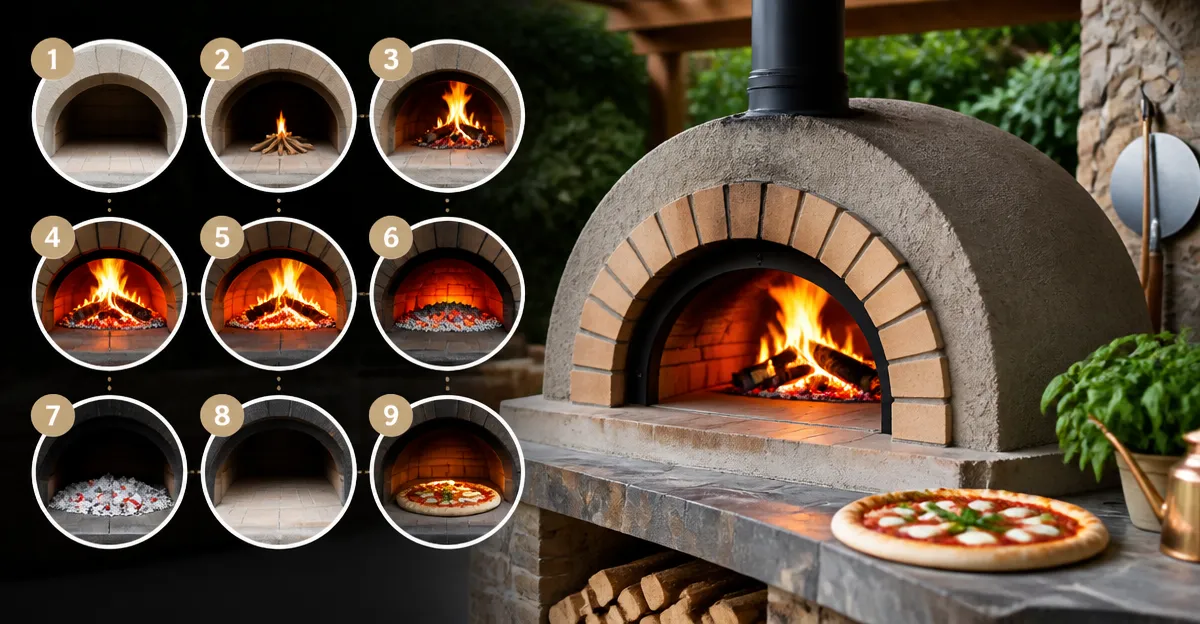
How to Season a Wood‑Fired Pizza Oven: Step‑by‑Step Curing Guide to Prep, Prevent Cracks & Fire Up Perfect Pizzas
Introduction
Seasoning a wood‑fired pizza oven is essential for creating a durable cooking surface and for developing the characteristic smoky flavor that makes Neapolitan‑style pizza unforgettable. This guide will walk the reader through every phase of the curing process, from initial cleaning to the final high‑heat test. By following these instructions, one can prevent common problems such as brick cracking, uneven heat distribution, and premature rust, thereby extending the oven’s lifespan and ensuring consistently great pies.
The information presented is practical for hobbyists who have purchased a new oven as well as for seasoned pizzaiolos who are refurbishing an older unit. Although the guide references specific products that simplify each step, the reader can still succeed with basic tools that are already available at home.
What You'll Need
- Protective gloves and heat‑resistant apron
- Stiff‑bristle brush for removing debris
- Natural hardwood pellets (if using a pellet‑compatible oven)
- Propane torch or long‑handled fire starter
- Infrared thermometer (optional but highly recommended)
- Food‑grade oil for sealing the stone (e.g., grapeseed oil)
- One of the following ovens to serve as the primary curing chamber:
- BIG HORN 12" Multi‑Fuel Pizza Oven – $120.64, 4.4/5 stars (2,613 reviews)
- Ooni Karu 12 Multi‑Fuel Pizza Oven – $248.95, 4.6/5 stars (622 reviews)
Step‑by‑Step Instructions
Step 1: Unbox and Assemble Your Oven
Begin by carefully removing the oven from its packaging. Follow the manufacturer’s assembly guide to attach the folding legs and secure the chimney. For the BIG HORN 12" Multi‑Fuel Pizza Oven, assembly requires no tools and can be completed in under ten minutes because the legs fold and lock into place. The lightweight stainless‑steel construction (25 lb) makes positioning the unit easy, which is advantageous when you need to move the oven for cleaning later in the process.
Proper assembly ensures that the oven will sit level, a prerequisite for even heat distribution during curing.
Step 2: Thoroughly Clean the Interior
Before any heat is applied, remove any protective coatings, dust, or packaging debris from the firebox, stone, and interior walls. Use a stiff‑bristle brush to sweep away loose particles. If the oven arrived with a protective wax coating, wipe it off with a damp cloth and allow the interior to dry completely.
Cleaning at this stage prevents unwanted odors and reduces the risk of ash‑related cracks later on.
Step 3: Inspect for Damage and Seal Gaps
Inspect the firebrick, stone, and metal panels for any visible cracks or gaps. Small gaps can be sealed with high‑temperature refractory cement, but many users find that a brief initial burn will naturally close micro‑cracks by expanding the material.
If you notice a major fracture, contact the seller for a replacement before proceeding. The Ooni Karu 12 features a custom‑designed fuel tray that maximises airflow, which helps to evenly distribute heat and reduce stress on the brickwork during the first high‑temperature cycle.
Step 4: Perform the First Low‑Heat Burn (150‑200°F)
Light a small amount of hardwood pellets or kindling in the firebox. Allow the oven to reach a gentle temperature of approximately 150‑200°F and maintain it for 30 minutes. This stage drives off residual moisture trapped in the stone and brick.
Use an infrared thermometer to verify the temperature if you have one; otherwise, gauge the heat by feeling the warmth radiating from the oven door. Maintaining a low temperature for this initial period reduces the likelihood of thermal shock when the oven is later heated to extreme temperatures.
Step 5: Gradual Temperature Ramp‑Up
Increase the fire intensity in 50°F increments every 15 minutes until you reach 500°F. This gradual ramp allows the stone and firebrick to expand uniformly, preventing cracks that can develop from sudden temperature spikes.
During this phase, rotate the firebox contents occasionally to promote even heating. The BIG HORN 12" Multi‑Fuel Pizza Oven reaches a maximum of 1110°F, but the controlled ramp‑up ensures that the oven’s internal components adapt safely.
Step 6: High‑Heat Curing (800‑950°F)
Once the oven consistently holds 500°F, increase the fire to achieve a temperature between 800°F and 950°F. Maintain this peak for 2‑3 hours. The high‑heat soak drives out any remaining moisture and begins the process of forming a protective carbon layer on the stone surface.
For ovens that support multiple fuel types, such as the Ooni Karu 12, you may choose wood for authentic flavor or charcoal for a cleaner burn. The oven’s fuel tray maximises airflow, ensuring a stable temperature throughout the curing window.
Step 7: Cool Down Slowly
After the high‑heat soak, allow the oven to cool naturally. Do not extinguish the fire abruptly; instead, let the flames die down and the temperature drop below 200°F before closing the door completely. This slow cooldown further reduces thermal stress.
Attempting to force a rapid cooldown can cause micro‑cracks that are difficult to detect until the oven is used for actual pizza cooking.
Step 8: Apply a Light Oil Coat (Optional)
Some pizzaiolos apply a thin layer of food‑grade oil to the stone after the first cure to create a semi‑seasoned surface that resists sticking. Using a brush, spread a small amount of grapeseed oil evenly over the stone, then heat the oven to 400°F for 20 minutes to allow the oil to polymerise.
This step is optional; the oven will perform well without it, but the oil can make the first few pizzas easier to slide off the stone.
Step 9: Test with a Real Pizza
Preheat the oven to its typical cooking temperature (850‑950°F). Place a prepared pizza on the stone, close the door, and rotate the pizza every 20‑30 seconds using a pizza peel. For a 12‑inch pizza, the cooking time should be between 60 and 120 seconds depending on crust thickness.
If the crust browns evenly and the cheese melts without burning, the curing process was successful. If you notice uneven spots or excessive charring, repeat the high‑heat soak for an additional hour.
Tips & Pro Tips
- Always use 100 % natural hardwood pellets when operating in pellet mode. Moisture‑laden pellets produce excess smoke and can cause uneven heating.
- Keep a spare set of stainless‑steel gloves nearby; handling the oven door at 900°F without protection can cause severe burns.
- During the high‑heat soak, position a small metal poker near the chimney to stir the flame. This encourages a more uniform temperature throughout the firebox.
- Document the temperature curve with a simple spreadsheet. Tracking the ramp‑up schedule helps you replicate the process for future ovens.
- Store hardwood pellets in an airtight container to prevent moisture absorption, which can affect burn quality.
Troubleshooting
| Problem | Possible Cause | Solution |
|---|---|---|
| Cracks appear after first high‑heat soak | Too rapid temperature increase | Repeat the cure with slower 25°F increments and allow longer low‑heat holds. |
| Poor flame distribution, hot spots | Uneven fuel placement | Spread pellets or wood evenly across the firebox and use the built‑in fuel tray for better airflow. |
| Pizza sticks to stone | Insufficient pre‑heat or lack of oil | Raise pre‑heat to at least 800°F and consider the optional oil coating. |
Conclusion
Seasoning a wood‑fired pizza oven is a systematic process that protects the cooking chamber, eliminates moisture, and creates a surface that yields perfectly crisp crusts. By following the nine steps outlined above, the reader can prevent cracks, achieve uniform heat, and enjoy restaurant‑quality pizza at home. Whether one chooses the affordable BIG HORN 12" Multi‑Fuel Pizza Oven or the premium Ooni Karu 12, the curing principles remain the same. With patience and careful temperature management, the oven will serve for many years of delicious pizza nights.
Products Mentioned in This Guide
Frequently Asked Questions
Why is seasoning a wood‑fired pizza oven important?
Seasoning creates a durable, heat‑resistant surface, prevents brick cracking and rust, and develops the smoky flavor essential for authentic Neapolitan pizza.
What are the first steps to prepare a new oven for seasoning?
Start by cleaning the interior with a stiff‑bristle brush, removing debris, and checking for any loose bricks or mortar before lighting a low‑heat fire.
How long should the gradual curing process take?
Cure the oven over 3‑5 days, gradually increasing the temperature each session until it can sustain 500‑600°F for at least an hour.
Can I use regular firewood instead of hardwood pellets?
Yes, natural hardwood firewood works fine; just ensure it’s dry and seasoned to avoid excess smoke and uneven heating.
What signs indicate the oven is fully seasoned and ready for high‑heat cooking?
When the bricks no longer emit cracks or smoke, the interior surface is uniformly darkened, and the oven holds 700°F+ without temperature drop, it’s ready for pizza.