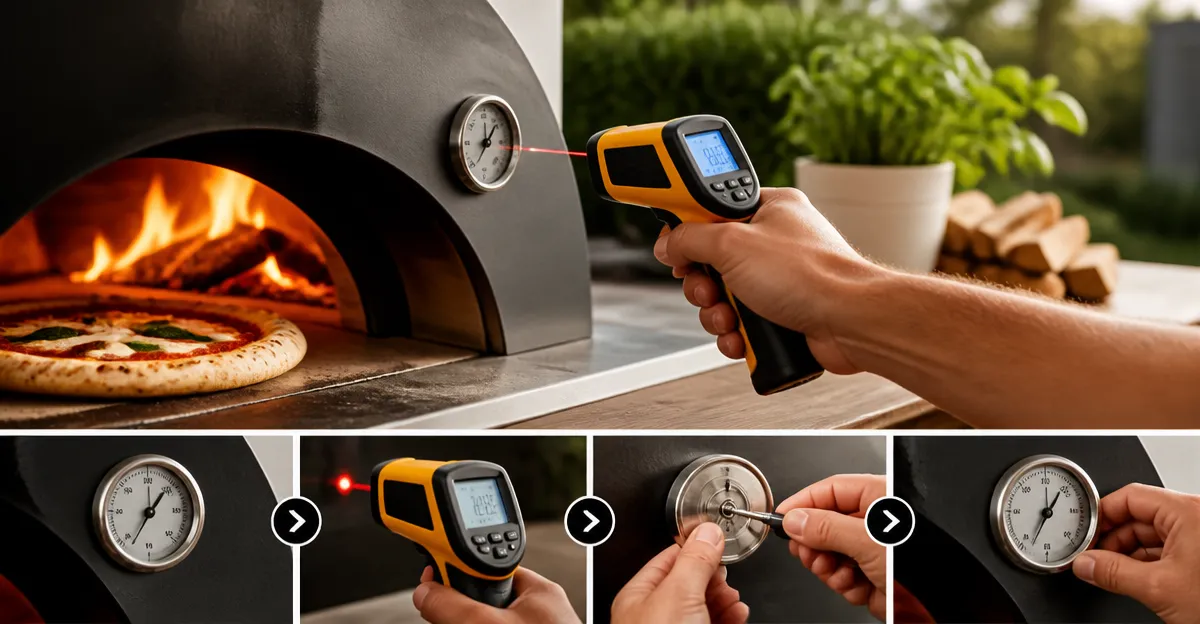
How to Calibrate a Pizza Oven Thermometer: Step‑by‑Step Guide for Accurate Heat and Perfect Pizza
This guide explains how to calibrate a pizza oven thermometer so that the oven reaches the intended temperature for optimal crust, cheese melt, and topping caramelization. Accurate heat control reduces wasted ingredients, improves cooking consistency, and enhances overall pizza quality. The reader will learn why calibration matters, which tools simplify the process, and how to verify results with confidence.
What You'll Need
- An infrared thermometer such as Etekcity Infrared Thermometer 774 or an alternative model listed below.
- A reliable heat‑resistant surface (e.g., a pizza stone) to serve as a reference point.
- A notebook or digital device for recording temperature readings.
- Two AAA batteries (included with most infrared thermometers).
- A clean cloth for removing debris from the oven interior.
Step 1: Prepare the Oven and Reference Surface
Begin by allowing the pizza oven to cool completely. Remove any ash, food residue, or loose stones that could affect temperature readings. Clean the interior with a damp cloth and let it dry thoroughly. Place a calibrated pizza stone or a metal baking tray on the oven floor. The stone provides a uniform thermal mass that approximates the temperature of the cooking surface, making it an ideal reference for calibration.
When the oven reaches the desired pre‑heat temperature, the stone will absorb heat evenly, allowing the infrared thermometer to capture a stable surface temperature. This step ensures that the measurement is not influenced by hot air currents or uneven heating zones.
Step 2: Power On and Set Up the Infrared Thermometer
Insert two fresh AAA batteries into the infrared thermometer. Turn the device on and select the appropriate temperature unit (°F or °C) based on personal preference or recipe requirements. Adjust the emissivity setting to match the surface material; most infrared thermometers, including the Etekcity Infrared Thermometer 774, allow emissivity values between 0.1 and 1.0. For a typical pizza stone, an emissivity of 0.95 provides accurate readings.
The Etekcity model features a 12:1 distance‑to‑spot ratio, meaning that at a distance of 14 inches (36 cm) the sensor measures a spot roughly 1.2 inches in diameter. Maintaining this distance improves accuracy and reduces the influence of surrounding heat sources.
Step 3: Take the Initial Temperature Reading
Stand at the recommended distance of approximately 14 inches from the stone. Aim the laser dot at the center of the stone, press the trigger, and wait for the LCD display to update. The reading should appear within 0.5 seconds, thanks to the rapid response time of the Etekcity Thermometer. Record the temperature in the notebook.
If the recorded temperature differs from the oven’s built‑in gauge by more than 10 °F, calibration is required. A discrepancy of this magnitude can lead to undercooked crusts or burnt toppings.
Step 4: Adjust the Oven's Built‑In Thermostat
Consult the oven’s user manual to locate the thermostat adjustment screw or digital offset setting. Incrementally increase or decrease the thermostat value until the built‑in gauge aligns with the infrared reading. For example, if the infrared thermometer shows 550 °F while the oven gauge reads 525 °F, raise the thermostat setting by the recommended increment (often 5 °F) and re‑measure.
Repeat the measurement process after each adjustment. Consistent alignment between the two devices indicates successful calibration. Document each adjustment step to create a reference log for future maintenance.
Step 5: Verify Calibration Across Multiple Zones
Move the infrared thermometer to different locations within the oven, such as the rear wall, side walls, and the area directly above the firebox. Record temperatures at each spot while maintaining the same distance. Uniform readings across the oven confirm even heat distribution, which is essential for consistent pizza cooking.
If significant temperature variance exists, consider using a second infrared thermometer for cross‑validation. The TempPro Infrared Thermometer Gun offers a comparable 12:1 distance‑to‑spot ratio and a response time under 500 ms, making it suitable for quick spot checks during verification.
Step 6: Fine‑Tune Using the Maximum/Minimum/Average Feature
Many infrared thermometers, including the TempPro model, display the maximum, minimum, and average temperatures recorded during a continuous scan. Activate the continuous mode by holding the trigger for a few seconds. Observe the average temperature as the oven stabilizes; this value provides a more reliable indicator of overall oven heat than a single snapshot.
Adjust the oven’s thermostat based on the average reading if it remains outside the target range. This approach reduces the impact of brief temperature spikes caused by opening the oven door or adding fuel.
Step 7: Record Final Settings and Create a Calibration Sheet
Once the oven gauge and infrared readings consistently match, write down the final thermostat setting, the emissivity value used, and the distance maintained during measurement. Store this calibration sheet near the oven or in a digital folder for easy access. Regularly revisiting the sheet ensures that the oven remains accurate after prolonged use or after cleaning cycles.
Periodically repeat the calibration process, especially after replacing the stone, changing fuel types, or performing major maintenance. Consistent recalibration extends the lifespan of the oven and maintains pizza quality.
Tips & Pro Tips
- Always measure in a well‑ventilated area and wear heat‑resistant gloves when handling hot stones.
- For ovens with a glass door, avoid measuring through the glass as it can distort infrared readings.
- Use the backlit LCD feature of the infrared thermometer for easy reading in low‑light environments.
- When measuring reflective surfaces such as polished metal, apply a small piece of matte tape to improve emissivity and reduce error.
- Consider the Ooni Digital Infrared Thermometer for ovens that exceed 800 °F, as it is calibrated for high‑temperature baking stones and provides color‑coded displays for rapid interpretation.
Troubleshooting
| Problem | Possible Cause | Solution |
|---|---|---|
| Infrared reading consistently lower than oven gauge | Emissivity set too low or distance too great | Adjust emissivity to 0.95 for stone, reduce distance to 12‑14 inches. |
| Reading fluctuates wildly | Air currents or moving flame | Allow oven to stabilize for at least 10 minutes before measuring. |
| Laser dot not visible | Battery low or laser disabled | Replace AAA batteries; ensure laser mode is enabled on the device. |
Conclusion
Calibrating a pizza oven thermometer involves preparing a stable reference surface, using a precise infrared thermometer, adjusting the oven's thermostat, and verifying uniform heat distribution. By following the steps outlined in this guide, one can achieve accurate temperature control, resulting in perfectly cooked pizza with consistent crust texture and topping melt. Regular calibration maintains oven performance and protects the investment in high‑quality cooking equipment.
Products Mentioned in This Guide
Frequently Asked Questions
Why is calibrating a pizza oven thermometer important?
Calibration ensures the oven reaches the target temperature, leading to consistent crust texture, proper cheese melt, and even topping caramelization.
What tools are needed to calibrate a pizza oven thermometer?
You need an infrared thermometer, a heat‑resistant reference surface like a pizza stone, a notebook or device for notes, batteries for the thermometer, and a clean cloth.
How do I verify the accuracy after calibrating?
Heat the oven to the desired setting, measure the stone’s surface with the infrared thermometer, compare the reading to the oven’s gauge, and adjust if needed.
How often should I recalibrate my pizza oven thermometer?
Recalibrate whenever you notice temperature drift, after major oven cleaning, or at least once every few months for reliable performance.
What common mistakes should I avoid when calibrating?
Do not calibrate on a cold oven, avoid measuring ash or debris, and ensure the infrared thermometer is held at the correct distance and angle.